|
An easy-to-use and free
tool for batch resizing of JPG pictures and photos.
|
 |
How to use it?
-
Download and unzip
PhotoResize400.zip and place the file on your desktop.
-
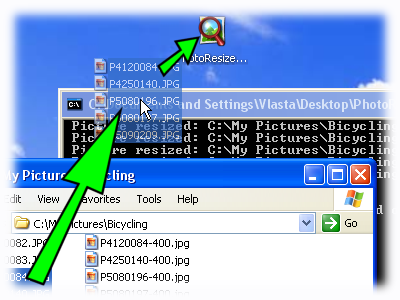
Drag and drop JPG files or
folders with JPG files on the application icon.
-
The tool will resize JPG images and save them
next to the originals. Names of the new pictures will be based on
the original names, with a suffix indicating their size. For
example, the resized version of MyPhoto.jpg will be called
MyPhoto-400.jpg, where the number 400 indicates the size of the
picture.
|
Configuration
-
By default, the application resizes the pictures to
400 pixels and preserves original aspect ratio.
-
The size of output pictures is
controlled by the name of the application. To generate
200 pixels images, simply rename the application to PhotoResize200.exe
-
Tip: it is possible to have multiple copies of the
application with different names to generate different image versions
quickly.
-
If you want to manually control both width and height
of the output image, rename the application to PhotoResizeWxH.exe, where
W is the requested width and H the requested height. It is your
responsibility to set correct aspect ratio in this case.
Highlights
-
The tool is using high-quality resizing
method, where color of each pixel is a weighted average of all
covered pixels from the original image. Linear interpolation is used
when zooming in.
-
The algorithm is optimized to work with
gamma-corrected pictures.
-
High speed.
What's new in version 2.0
-
Custom destination folder and file
name - the -c switch was enhanced and allows specifying a template for
output file path. Simple examples:
-
Default behavior of the tool equals
-c<ROOT><PATH><NAME>-<SIZE>.jpg
-
To put resized files into folder C:\Resized Images,
use "-cC:\Resized Images\<PATH><NAME>.jpg" (the double quotes are
needed, because, there is a space in the path).
-
To simply put files to current folder of the
process, use -c<NAME>.jpg Make sure that the current folder is set on
command line prior to running the tool.
-
New predefined output quality - PhotoResize400G.exe
for good quality (75%).
-
PhotoResize400O.exe skips the need
to press Enter when the tool finishes (and also blocks progress report).
-
PhotoResize400F400x300.exe ensures
that the resulting image fits into the defined frame
Run Picture Resizer from context menu of .jpg files and folders
Version 2.0 introduces a new usage scenario. The tool supports
intergration with Windows shell and allows you to define one or more
commands that are added to Windows Explorer context menu (the menu that
appears when you right-click on a file).
To add a command to context menu, start the tool and
type the name of the command to the "Command name" field and additional
command line options (if you want to use them) to the "Additional options"
field. Finally click the "Add to context menu" button.
To remove all created commands, click the "Remove
all".
-
And finally a simple trick that lets you run the tool
from Explorer context menu:
|
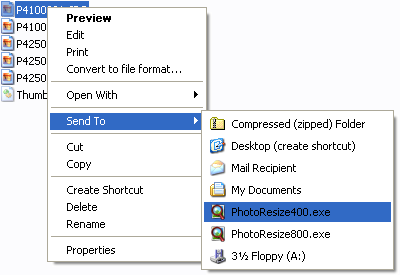 |
Open Windows Explorer and go to your "Send To"
folder (usually C:\Documents and Settings\<your user name>\SendTo).
Place one or more configured copies of Picture Resizer there. Items
placed in this folder will appear in Send To context menu as
demonstrated on the picture.
Tip: you may change the tool's name to for example "Resize to 400.exe"
instead of "PhotoResize400.exe". |
|
